How to Generate Perfect Perler Bead Patterns from Photos: The Complete Guide
 Perler bead art has evolved far beyond the simple pegboard kits of childhood. Today, crafters are turning pet portraits, anime characters, fan art, and even wedding photos into intricate fuse bead mosaics that hang on walls, decorate desks, and sell on Etsy. The bridge between a photograph and a finished bead piece is the bead pattern generator — a tool that converts images into pixel grids mapped to real bead colors.
But here's the problem almost every crafter encounters: you upload a beautiful photo, hit "generate," and the result looks like a muddy, unrecognizable mess of random colors. The eyes blur into the cheeks, the background bleeds into the subject, and what should be a crisp 50×50 bead portrait looks like a pixelated accident.
The issue isn't the generator. It's the image you're feeding it.
This guide walks you through the professional workflow for creating stunning perler bead patterns — from AI-powered image preprocessing to final pattern export — using techniques that experienced bead artists rely on but rarely share publicly.
Why Most Photo-to-Bead Conversions Fail
To understand why raw photos produce poor bead patterns, you need to think about what happens during conversion. A bead pattern generator takes your image and performs three operations: it downscales the resolution to match your grid size (say, 50×50 pixels), it quantizes the colors to match available bead palettes (typically 72–168 colors depending on brand), and it maps each resulting pixel to the nearest real bead color code.
Each of these steps introduces information loss. A 4000×3000 pixel smartphone photo crammed into a 50×50 grid means each "bead" represents roughly 80×60 pixels of original image data. The algorithm must decide what single color best represents that entire block. When your source image contains subtle gradients, complex shadows, fine textures, and hundreds of similar hues, the algorithm makes compromises — and those compromises stack up into visual noise.
Consider a portrait photo. Human skin contains dozens of subtle color variations from lighting, shadow, and natural pigmentation. When the generator quantizes these into the 15–20 skin-adjacent bead colors available in a Perler palette, the result is often a patchy, spotted face where shadow pixels get mapped to dark brown beads and highlight pixels jump to pale peach. The face loses its coherence because the source image was never designed to survive this level of simplification.
The same problem plagues pet portraits (fur texture creates chaos at low resolution), landscape photos (sky gradients produce banding), and detailed illustrations (fine lines disappear entirely).
The Pro Secret: AI Image Preprocessing
The single most impactful thing you can do to improve your bead patterns has nothing to do with the pattern generator itself. It happens before you ever upload your image.
Professional bead artists and Etsy sellers who produce consistently clean, recognizable patterns share a common workflow: they preprocess their source images using AI to create bead-optimized versions before feeding them into a pattern generator. This preprocessing step transforms a complex photograph into an image that is inherently designed to survive aggressive downscaling and color quantization.
The goal of preprocessing is to produce an image with these characteristics:
Simple, clean outlines. The subject should have clear, continuous edges — ideally with a visible dark outline that separates it from the background. This ensures the silhouette remains readable even at very low pixel counts. When each pixel represents a physical bead, there's no room for soft, anti-aliased edges.
Flat color regions. Instead of smooth gradients and subtle shading, the preprocessed image should use solid blocks of color. Think of the difference between a photograph and a cartoon or anime illustration. Flat color areas translate beautifully into bead patterns because each region maps cleanly to a single bead color without the algorithm struggling to average dozens of similar hues.
Limited color palette. The fewer distinct colors in your source image, the more control you have over the final pattern. An image with 6–12 well-chosen colors will produce a dramatically cleaner pattern than one with thousands of subtle variations. This doesn't mean your pattern will look simplistic — it means every color serves a clear purpose.
Strong subject-background separation. The subject should be clearly distinct from its background, ideally with the background removed entirely or replaced with a single solid color. This prevents the generator from wasting precious bead colors on background noise and ensures the subject dominates the pattern.
Minimal texture and noise. Fur, fabric weave, wood grain, skin pores — all of these textures create visual noise that confuses pattern generators at low resolutions. The preprocessed image should smooth these away while preserving the essential shapes and color relationships.
How to Use AI to Create Bead-Optimized Images
Modern AI image generation and editing tools — ChatGPT with DALL·E, Midjourney, Stable Diffusion, and others — are remarkably effective at transforming complex photos into bead-friendly versions. The key is knowing exactly what to ask for.
The Recommended AI Prompt
Here is a battle-tested prompt template that consistently produces excellent results for bead pattern preprocessing. Copy it, replace the bracketed sections with your specifics, and use it with ChatGPT (GPT-4o with image upload), Midjourney, or any AI image tool that accepts reference images:
English Prompt:
Convert this image into a simplified illustration optimized for perler bead crafting. Use flat, solid color blocks with no gradients, no shading, no lighting effects, and no texture. Limit the palette to a maximum of [8–15] distinct colors. Add a clean, continuous dark outline around the subject so the silhouette is clearly readable at small sizes. Remove the background completely (make it transparent or a single solid color). Simplify all details — keep only the essential shapes that define the subject. No anti-aliasing, no dithering, no soft edges. The style should resemble a clean cartoon or flat vector illustration, not a photograph.
Prompt Customization Tips
The number of colors you specify matters enormously. For small patterns (under 30×30 beads), stick to 6–8 colors — this forces the AI to make bold, decisive color choices that read clearly at tiny scales. For medium patterns (30–60 beads wide), 10–15 colors gives you enough range for recognizable portraits while keeping the pattern manageable. For large mosaics (60–100+ beads), you can push to 20–30 colors, though more isn't always better.
If you're converting a pet portrait, add to the prompt: "Simplify the fur into 3–4 solid color zones. Keep the eyes as the most detailed feature with clear color contrast."
For anime or game characters, add: "Maintain the character's iconic color scheme exactly. Use bold, saturated colors that match common bead palette colors."
For logos or text-based designs, add: "Maintain sharp geometric edges. Every line should be perfectly straight or smoothly curved with no pixel artifacts."
Alternative AI Workflow: Text-to-Image Generation
You don't even need a source photo. If you can describe what you want, AI can generate a bead-optimized image from scratch:
Create a [32×32 / 48×48] pixel art image of [your subject] in a flat, cartoon style. Use exactly [number] solid colors with no gradients or shading. Each pixel should represent one perler bead. Include a dark outline around the subject. The background should be a single solid color or transparent. Style: clean, chunky pixel art suitable for physical bead crafting.
This approach is particularly powerful for creating original designs, fan art, or seasonal decorations where you don't need photographic accuracy.
Step-by-Step: The Complete Bead Pattern Workflow
Now that you understand the theory, here's the complete professional workflow from idea to finished pattern.
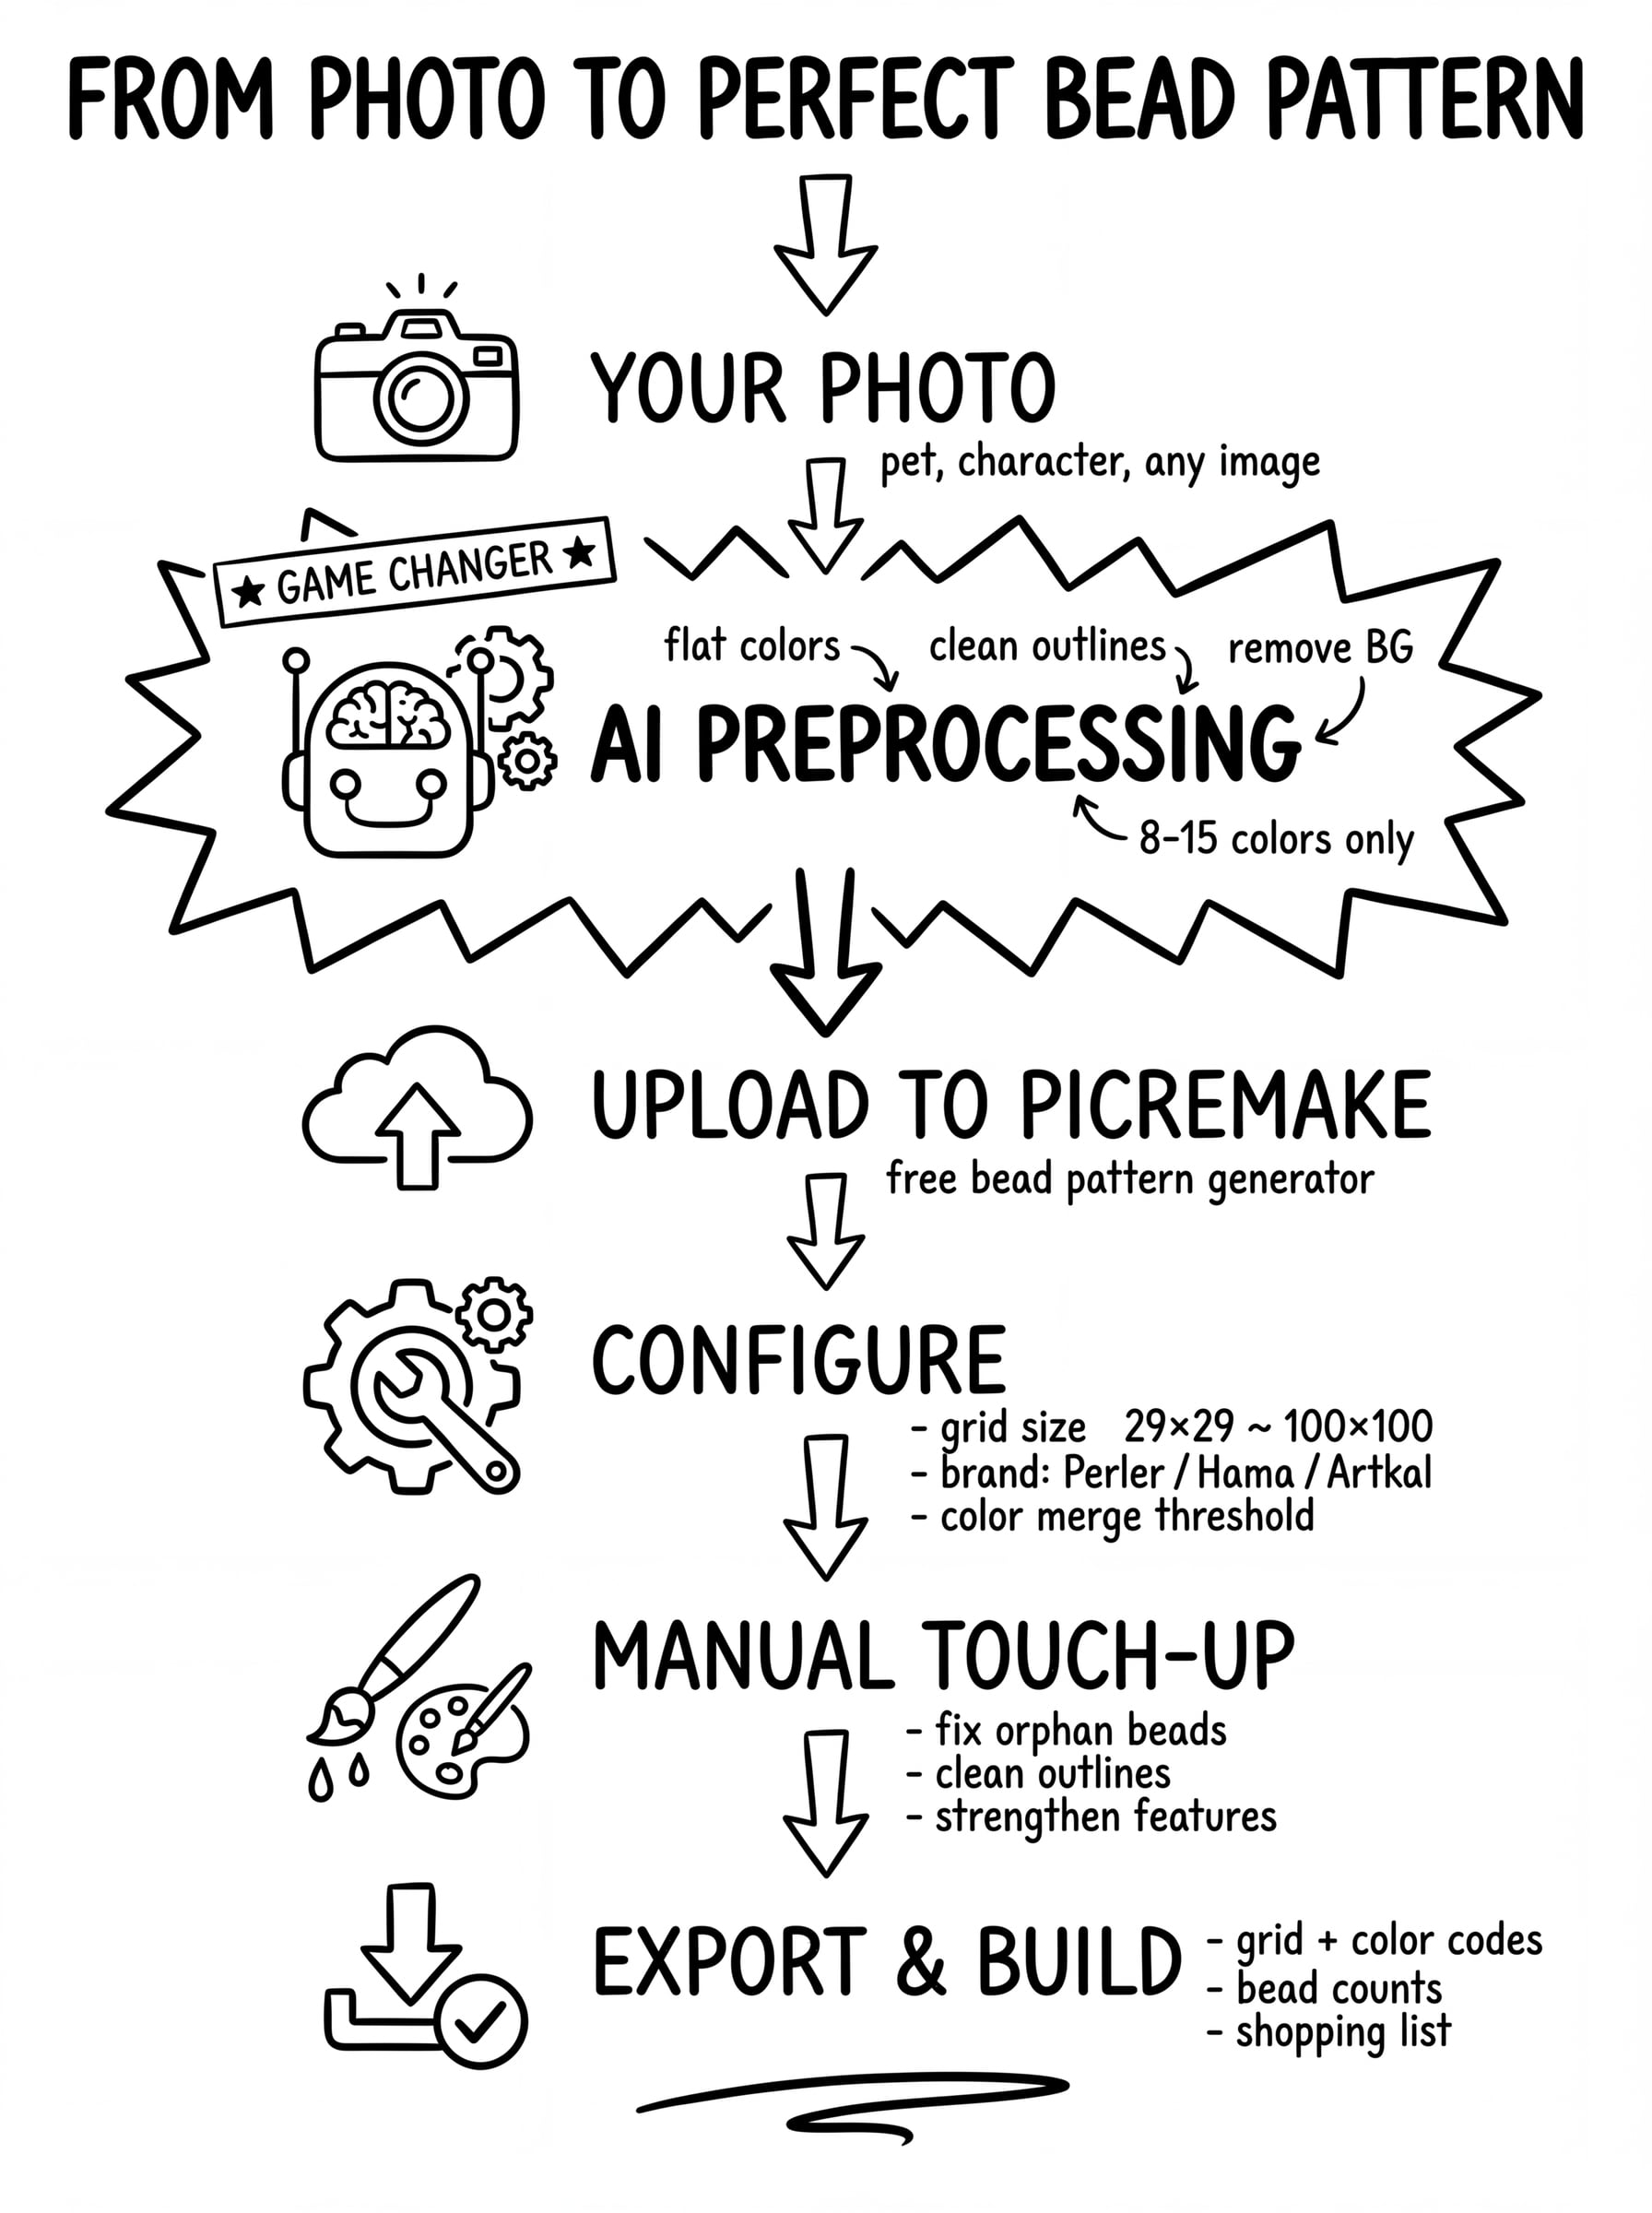
Step 1: Prepare Your Source Image with AI
Start with your reference photo or idea. Open ChatGPT (or your preferred AI tool), upload the image, and use the preprocessing prompt from above. Review the AI's output critically:
-
Can you clearly identify the subject at a glance?
-
Are the color regions solid and distinct from each other?
-
Is there a clear outline separating the subject from the background?
-
Does the image look like it would still be recognizable if you squinted at it from across the room?
If the answer to any of these is no, iterate. Ask the AI to simplify further, reduce colors, or strengthen the outline. This step is worth spending time on — every improvement here translates directly into a better final pattern.
Step 2: Upload to a Free Bead Pattern Generator
With your AI-preprocessed image ready, head to PicRemake's free Bead Pattern Generator. Upload your optimized image and you'll immediately see the difference compared to uploading a raw photo. The pattern will be cleaner, more recognizable, and require far less manual correction.
Step 3: Configure Your Grid Settings
Grid size is the most important setting. It determines how many beads wide your finished piece will be, which directly affects detail level, difficulty, and material cost.
-
20–30 beads wide: Great for keychains, small ornaments, and beginner projects. Requires very simple source images.
-
30–50 beads wide: The sweet spot for most projects — coasters, small wall art, character sprites. Balances detail with practicality.
-
50–80 beads wide: Detailed portraits, complex scenes. Requires multiple pegboards and significant time investment.
-
80–100+ beads wide: Large wall art and mosaics. Impressive results but demanding projects that can require thousands of beads.
A practical tip: your grid width in beads roughly equals the number of standard 29×29 pegboards you'll need across. A 58-bead-wide pattern needs at least 2 boards side by side.
Step 4: Fine-Tune Colors and Palette
PicRemake lets you select your bead brand color system (Perler, Hama, Artkal, or Mard) and adjust the similar-color merge threshold. Here's how to use these effectively:
Color system selection: Choose the brand you actually own or plan to buy. Each brand has different color codes and slightly different actual hues. Perler offers around 70 standard colors, Hama has a similar range, and Artkal provides the widest selection with 168+ colors for their mini beads. Stick to one brand per project — mixing brands can cause uneven melting during ironing.
Similar-color merge threshold: This is a powerful but often misunderstood setting. A higher threshold merges colors that are close to each other, reducing the total number of distinct bead colors in your pattern. Start around 25–35 for preprocessed images. If your pattern still has too many similar colors (like three nearly identical shades of blue), increase the threshold. If important color distinctions are being lost, decrease it.
Step 5: Manual Editing and Cleanup
Even with excellent preprocessing, most patterns benefit from a few minutes of manual touch-up. Use the built-in brush and fill tools to:
-
Clean up the subject's outline: Ensure there's a consistent border, especially around the face or key features.
-
Fix "orphan" beads: Single beads of a different color surrounded by another color often look like mistakes in the finished piece. Replace them with the surrounding color.
-
Strengthen key features: Eyes, mouths, and other small but important details sometimes need manual adjustment to read correctly.
-
Simplify the background: If any background noise survived preprocessing, paint it over with a single color or remove it entirely.
Step 6: Review Bead Counts and Export
Before downloading, check the real-time bead count summary. This tells you exactly how many beads of each color you need — invaluable for shopping. PicRemake displays this with official color codes matched to your selected brand, so you can create a precise shopping list.
Export your pattern as a high-resolution PNG with grid lines and color codes. Print it at a size where each grid cell is easily visible (usually tiling across multiple pages for larger patterns), and you're ready to build.
Best Practices from Professional Bead Artists
After researching techniques used by experienced bead crafters, Etsy sellers, and bead art communities, here are the most consistently recommended practices:
Always do a test run at small scale. Before committing to a 100×100 masterpiece, generate the same image at 29×29 (one pegboard) first. If it's not recognizable at that size, the full-size version will likely disappoint too. This is especially important for portraits.
Prioritize contrast over detail. A pattern with strong light-dark contrast will always look better than one with subtle color variations, even if the subtle version is technically more "accurate." When preprocessing with AI, don't be afraid to push for bolder, more saturated colors than the original photo.
Plan your pegboard layout before you start. For multi-board projects, know exactly how the pattern splits across boards. Mark the board boundaries on your printed pattern. Nothing is more frustrating than discovering an alignment issue 3,000 beads into a project.
Use the "squint test." Print your pattern, hold it at arm's length, and squint. If you can identify the subject, it will work as a bead piece. If it's unrecognizable, go back to the preprocessing step and simplify further.
Keep your first projects under 50×50. The learning curve for large bead projects is steep. Color matching, ironing technique, and board alignment all improve with practice. Start with smaller, simpler patterns to build confidence and skill before tackling ambitious pieces.
Ironing matters as much as the pattern. The best pattern in the world can be ruined by poor ironing technique. Use parchment paper (not wax paper), apply even pressure, and iron in slow circular motions. For large pieces, consider the masking tape method — tape the top of your beads, flip the board, remove the pegboard, and iron the back for more even results.
Why Preprocessing with AI Changes Everything
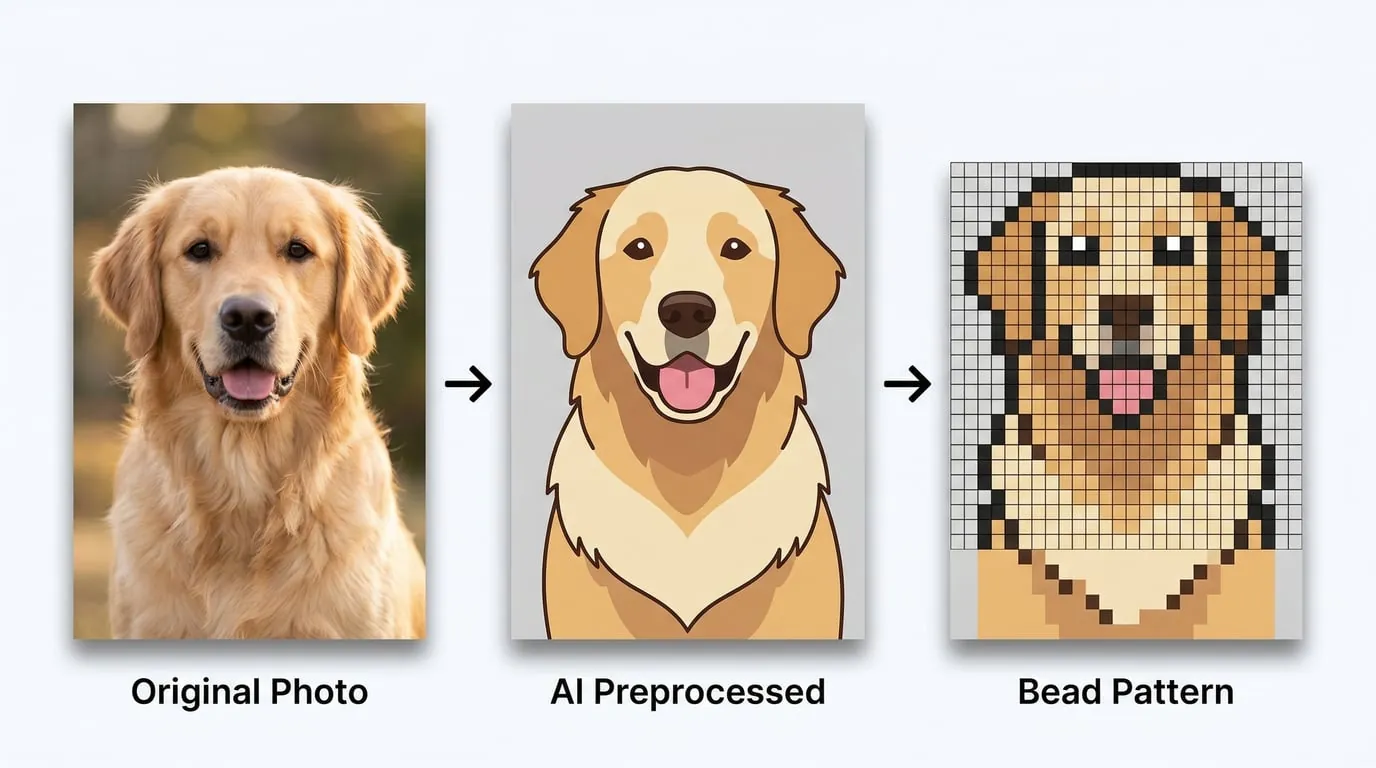
To illustrate the difference, imagine converting a photo of a golden retriever into a 40×40 bead pattern.
Without preprocessing: The generator receives a photo with hundreds of fur color variations, complex shadow patterns, a busy background, and soft edges everywhere. The resulting pattern has 40+ colors, the dog's face is a patchwork of similar browns, the eyes are barely visible, and the background consumes half the available colors. The finished bead piece would look like abstract noise.
With AI preprocessing: You first ask AI to convert the photo into a flat cartoon illustration with 10 colors, a clear dark outline, solid color regions for the fur (golden, light golden, cream), distinct eyes, a removed background, and no texture. The generator receives this clean image and produces a pattern where the dog is immediately recognizable, the eyes pop, the silhouette is crisp, and you only need to buy 10 colors of beads. The finished piece looks like intentional, charming pixel art.
That's the difference between a frustrating craft project and one you're proud to display or sell.
Frequently Asked Questions
What's the best grid size for beginners?
Start with 29×29 — it fits exactly one standard pegboard and forces you to work with simplicity. As you gain confidence with color matching and ironing, scale up to 50×50 and beyond.
Can I use any photo directly without AI preprocessing?
You can, but results vary dramatically. Photos that already have simple compositions, strong contrast, and limited colors (like pixel art, logos, or cartoon screenshots) often convert well directly. Complex photos with gradients, textures, and busy backgrounds almost always benefit from preprocessing.
Which bead brand should I choose?
Perler is the most widely available in North America with a solid color range. Hama is popular in Europe with excellent quality. Artkal offers the widest color selection (168+ colors for mini beads) and is favored by advanced crafters who need precise color matching. For your first project, choose whichever brand is easiest to source locally, and stick with it.
How many beads do I need to buy?
PicRemake's bead count feature gives you exact numbers per color. As a rule of thumb, a 29×29 pattern uses about 841 beads total. A 50×50 pattern uses 2,500. A 100×100 uses 10,000. Always buy 10–15% extra to account for defective beads and mistakes.
Is the PicRemake bead pattern generator really free?
Yes, completely free with no account required. All image processing happens locally in your browser — your photos are never uploaded to any server. You can generate, edit, and download unlimited patterns with full bead counts and color codes.
Can I use this for Hama beads, Artkal beads, or other brands?
Absolutely. PicRemake supports multiple color systems including Perler, Hama, Artkal, and Mard. Simply select your brand in the color system dropdown, and all color codes, labels, and material lists will update to match your chosen brand.
Start Creating
The gap between "I want to make a bead pattern" and "I have a beautiful finished piece" is smaller than you think. The workflow is simple: preprocess your image with AI to get clean lines and flat colors, upload it to PicRemake's free Bead Pattern Generator, adjust your settings, make a few manual tweaks, and export your pattern with a complete shopping list.
The AI preprocessing step is the game-changer that separates frustrating, muddy patterns from crisp, professional results. It costs nothing (ChatGPT's free tier supports image editing), takes just a few minutes, and dramatically improves every pattern you create.
Your next bead masterpiece starts with a better image. Give it a try — upload a photo, run it through AI first, and see the difference for yourself.
Ready to create your first pattern? Try the PicRemake Bead Pattern Generator — free forever, no signup required.
Related Posts
 AI Tools
 AI Tools
 AI Tools